Wednesday, 30 May 2012

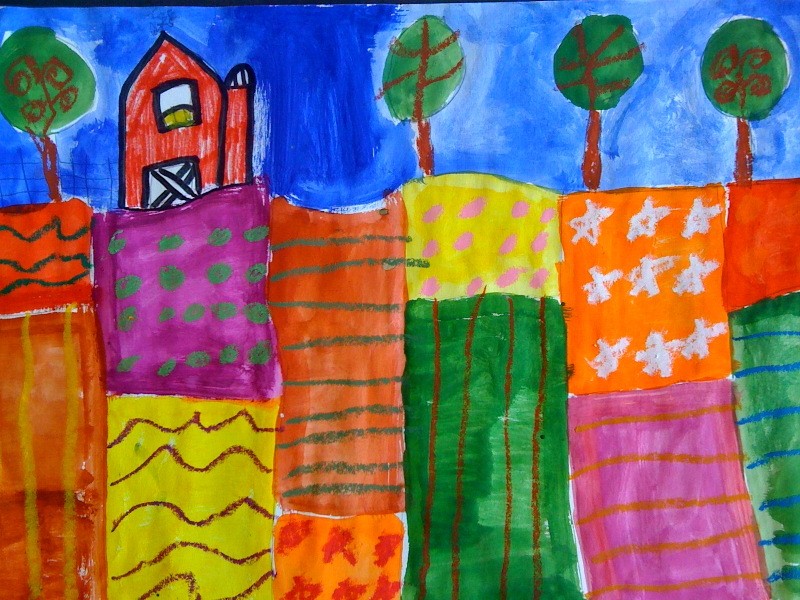
Grade One Farm Landscapes


We have been learning about nutrition and where food comes from in our class.  I was inspired by folk art landscapes and the post from Painted Paper in creating this lesson.


Day One:  The students drew their horizon.  We added the barn, tree shapes and some students added a fence.   They were then instructed to draw at least 5 vertical lines, dividing their landscapes.  Next they drew a horizontal line in each section at varying heights, dividing each strip into two.  Finally we used blue tempera blocks to paint the sky.

Day Two: The students again used tempera block paints to paint the different sections of their landscape as well as the tops of the trees.

Day Three:  The students used markers to colour and outline their barns.  They used oil pastels to add patterns to their land sections, fences, and for the tree stumps and branches.

I love how bright and colourful they turned out!  The kids are so proud of them!


Mother's Day Clay Plates

MOM & ME by Grade 3 Student


I LUV MY MOM by Grade 4 Student


I made these clay plates with my son's grade 3/4 class.  First we rolled out our clay into a flat slab.  Then using a styrofoam plate turned upsidedown as a template, we traced a circle using wooden kabab skewers.  After cutting out the circle shape they carfully molded their circle into their own styrofoam plate.  I gave them a quick lesson on how to score and slip other pieces onto their plate. 

I had a handful of small cookie cutters (heart, star, butterfly, tulip, bell, flower) but I encouraged them to be creative with the those basic shapes.  Hence, the bell also became a female head, half of a heart became a bird, the tulip and bell combined to make a cat, etc.  Some created their own shapes by hand.

They were also provided with a set of mini alphabet stamps as well as other worded stamps to create impressions into the clay.  

A week later we painted the entire plate white for the first coat.  Then we used acrylic paints of various colours.  When dry, we added a coat of liquid varnish to seal the paint.  The photos are in the pre-varnished state.


Wednesday, 2 May 2012

Splat the Cat and Friends

I LOVE how these little Splat the Cat inspired bowls turned out!!!
I got the idea for this clay project from a little cat bowl I saw on Etsy.com and decided to try it out with my Grade Ones.


Some of my students wanted to glaze their cats a different colour, and so we have some of Splat's friends:


First we rolled out our clay into a slab.  I gave them a cat shaped tracer that they had to draw into their slab with a wooden kebab skewer.  Then using a plastic knife they cut away the extra clay.  Using their fingers they carefully smoothed out the outer edges of their cats.
They also used the skewers to try to make impressions in the paws as you can see in the blue cat below.  Some kids just drew lines on their paws.


Then using their skewers and  various tools around the classroom they created the faces for their cats.  Impressions for the eyes were made using the flat end of a pencil crayon.


When all their details were done they gently lay their cat slabs into a styrofoam bowl, carefully molding the cat into the shape of the bowl.

When they were completely dry we fired them in the kiln.  We glazed them and refired them then added small googly eyes as the final touch.

Tuesday, 24 April 2012

Garden Gnomes

We made these cute little garden gnomes to go with our water color gardens!


We are currently studying geometry in math and so I made a few template tracers for the shape of our gnomes.  We used a large triangle for the body, a small triangle for the hats, a large white circle for the beards and an oval for the face. 

My students cut strips into the white circle to create their beards and cut out their own boots and belts.  I love that this student added glassed to her gnome!

We also used painted eyes and a nose with our finger prints, then added eyebrows and eye details with pastels.


Watercolor Gardens

This was a fun watercolor project for my Grade One class.  We first painted 'blobs' of different colors using watercolor paints starting with the lightest color and ending with the darkest.  They painted approximately 6 blobs with each colour. 


When they were dry the students filled in the
remaining background with green paint.

(Need to remove the flash from my camera!)

Using black markers the students drew little circles in each blob and then drew petals by extending lines from the circles to the outer edge of the blobs.  I had them practice first before attempting on their artwork. 


Some children had some difficulty getting their petals to fill the entire paint blob but were able to add extra petals to fill the space they had missed.


Easter Egg Carton Chicks

Here is a simple and fun Easter craft that I got from FamilyFun.go.com. 
Here is the link with instructions:

The kids were thrilled with the results and couldn't wait to take them home.  They looked even cuter when we added their painted easter eggs!


Thursday, 5 April 2012

LinkWithin

You May Also Like

Followers