Showing posts with label owls. Show all posts

Wednesday, 9 July 2014

Rock Painting

I have been wanting to try my hand at rock painting for some time.  On a recent hike my kids and I grabbed a few rocks from the trail and gave it a go.

 It was definitely a lot harder than I expected.  It takes a steady hand and lots of time to let colours dry as you layer them.

My favorite by far was the penguin that I painted.

We all tried our hand at painting an owl.
The bodies were painted with acrylic paints and details were added with Sharpie markers.


My daughter also made a lady bug.

Saturday, 16 November 2013

Oil Pastel Owls

So I was at a loss of what to do with our Big Buddy class this week.  When I asked my buddy teacher if she had any ideas she said she had owls on the brain.  Owls?  I LOVE owls!

So here is what we came up with:


This piece was completed by a Grade 3 student

All of the pieces in this post were completed by students in grade 1, 2 and 3.

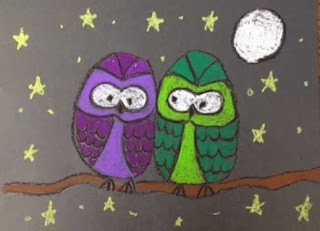
Taking turns we had students place both hands on their paper while their buddy, using the hands as a guide, made 2 large ovals around their hands.  As mentioned in previous lessons, I use this technique to help the kids draw BIG.  They have such a tendency to draw really small and bigger shapes help when filling in with colour.

Then we did a directed draw for the first owl.  Here are the steps:


 After drawing the details of both owls students outlined their drawings with black pastel.  Then they chose the colours for their owls.  They were directed to choose one colour for each owl and choose both a light and dark shade for contrast.


Then they added a branch, stars and a moon.  They then touched up their outlines, especially around the eyes where the original line may have smudged or faded during colouring.  Big Buddies helped with the touch ups for the younger students.


Wednesday, 23 January 2013

Clay Owl Ornaments

This clay activity is very popular on Pinterest and I couldn't wait to try it this year.  You can find the easy to follow instuctions on the crafty blog 4 Crazy Kings


We used air-dry clay to create these ornaments.  We also added a few extra details.  We used paperclips to make feather-like impressions on the wings and a wooded skewer to make the feet.  Then we added a paperclip to the top of the head so that we had something to tie our ribbon to.

When they were completely dry they were painted all over with white acrylic paint.  Then the kids had gold and silver paint to use as they wished.  We glued on dollar store gems to the eyes and added the ribbon.

My photos aren't the best as I was in a rush to get a couple of shots of them on my iPhone before they were sent home before the holidays...


Tuesday, 17 July 2012

Pinch Pot Fun


I love summer!  With my time off from the classroom I'm free to try different projects that have been on my mind that I may not have had time to do otherwise.  I had some clay left over from when I did the clay plates with my son's class and decided to do some experimenting with pinch pots.  My daughter wanted to join in the fun so we created these pinch pot owls.


We used air dry clay.  First we created a simple pinch pot.  Then we added the wings which were actually made from a large heart cookie cutter that we then cut into half to create 2 equal wings.  Then we made 2 circles for the eyes and attached them.  Lastly we attached a beak shape.

We then used a bent paper clip to make impressions for the feathers.  A marker cap was used to help create the eyes and any other impressions were make by a wooden skewer.


This white owl in my 7 year old daugher's owl.  As I didn't have much in the way of acrylic paints at home she had to resort to painting it all white.  She didn't mind.  She said it was a snowy owl.

I think I'll buy some citronella tea lights and use them as candle holders during the summer months on our patio!


Here are some other pinch pot creations.


LinkWithin

You May Also Like

Followers