Showing posts with label craft. Show all posts

Monday, 2 January 2017

Stained "Glass" Trees


Here is an easy paper activity to do with your classes.  I got this idea from  HERE.  This activity could easily be done with the trees all in white and tissue in different cool colours for a fabulous winter window display - maybe next year for me! 


Students first cut out the tree template from 9 X 12 inch green card stock.  Then they glued pre-cut coloured strips of construction paper to one side of the tree.  They trimmed off any parts that showed past the tree on the outside.  They then added dots of white glue all around the template and strips and laid down a piece of green tissue paper.  When dry, they carefully trimmed off the excess tissue.


I did limit the kids to 6 or 7 strips though I don't think that's necessary: however, I do recommend that they use no less than 6.


Monday, 28 September 2015

Coffee Filter Trees


I had to share these incredibly easy fall trees that my Grade One class made!

Students used eyedroppers to drip liquid water color paints onto coffee filters.  Don't be stingy with the paint as they will be brighter. You could also use washable markers to colour the filters and then spray with water.  But again, make sure they fill the filter with lots of colour!

 When dry, they cut out this fabulous tree template.  The template for the tree is from a book that does not allow me to share it here due to copyright limitations.  However, you could easily use something a lot less complicated as it was a challenge for a few of them.  However, you could hear a pin drop during cutting time due to the extreme need for concentration!!

Here is a free online template you could use for the tree.

These look so great in my window and it makes me smile every time I walk
 into my room and see them!

Thursday, 8 January 2015

December Art

I know the holidays are over but I just wanted to share some of the wonderful art and crafts that my class did during the month of December.


 Love these salt dough ornaments!  So adorable and easy.  Find the original post here.  We added white iridescent sparkles to ours.  I will definitely do these again!


  Here is my version of the singing reindeer.  Think I would forgo the pipe cleaner antlers for a paper version next time - some of them have sort of an insects vibe :)


We made these paper strip Christmas trees.  Find the original post here.


And last but not least, we made these incredible elves with the help of Rob and his video at Art for Kids Hub.


I hope you all had a wonderful holiday!
Wishing you all the best for 2015!!!

Tuesday, 4 November 2014

Halloween Arts and Crafts

Okay, I know I have not been very good about posting regularly lately.  My life seems to have been caught in a bit of a whirlwind the last couple of months and I feel like I have so much on my plate.  But I promise to be better!!!  It only took a fellow co-worker to post a Halloween activity I did on her blog before I put it on mine to get me in gear!  Thanks Sandra!  Go ahead and check out her Savvy Teaching Tips blog for some amazing teacher units.

Here are a few of the activities we have been working on:

Pumpkins:


I got this pumpkin art lesson from Barista Kids.  You can get a detailed lesson plan if you click on the link.  I substituted the oil pastels for chalk pastels.  I love using chalk pastels as they are so forgiving.  I can get the kids to start their first shape and tell them, "make it bigger" without negatively affecting their piece of work.  We did however use orange and green oil pastel to outline our drawings and add swirly vines.


Frankensteins:

Here is a really cute and easy craft I did on Halloween day.  Our primary wing usually does Halloween stations where classes will rotate through each of the four in our wing.  We only have about 20 minutes for each station so I can't plan anything too detailed.  This is what I came up with:

The colour is not the greatest in this iPhone photo

These Frankenstein faces were done on a 4 1/2 X 6 inch piece of green construction paper.  We did a directed draw in pencil, starting with the hair, straight line across for the eyebrows, nose, then eyes and mouth.  They used white chalk to colour in the eyes then used black oil pastel to trace over their drawing and colour in their hair.  The final step was gluing one inch squares of grey construction paper to the back of the head.  These were easily done in the 20 minute time slot and I think there was only one student who did not completely finish!  I wish I had more to show you as they turned out amazingly well, but the students got to take them once they left my classroom.


Mummies:


I got this adorable activity idea from Edventures With Kids, where you can get the full instructions.  The only things I changed was we used a gingerbread man template and didn't make it into a garland.  We also cut our paper eyes instead of googlies.

Friday, 21 February 2014

Valentine Mailboxes

We made these super sweet mailboxes for Valentine's day! 


I had all the kids bring in cardboard boxes from crackers, instant oatmeal, Kleenex, etc.  We cut off all the loose cardboard at one end to make the opening.  The toughest part was wrapping the black craft paper around the boxes.  My aide and I helped the kids with that part but the rest of it was up to them.  They had lots of different heart tracers to create the tummies, beaks and feet and even the flippers which were a heart cut in half.  Some of the kids were so into them that every free moment they were creating all sorts of accessories: hats, sunglasses, bracelets...  Some even wanted to play with them at center time! 


Saturday, 25 January 2014

Polymer Clay Creatures

I haven't posted in a while.  I finally got myself a new laptop, something I probably should have done about 8 months ago but was avoiding...  Anyway, it has been a bit of a learning curve getting accustomed to the new features but I think I'm making progress.

My 9 year old daughter was at home sick yesterday and when she felt up for it we decided to break open her new Polymer Clay kit that she got for her birthday.  She had been experimenting with an older kit previously but this was my first time working with polymer. 

After searching Pinterest for some ideas (and hopefully some tutorials) we managed to create these together:


The first one we made was they Mickey charm, in honor of our upcoming trip to Disneyland.  My kids have never been before so the are very excited!


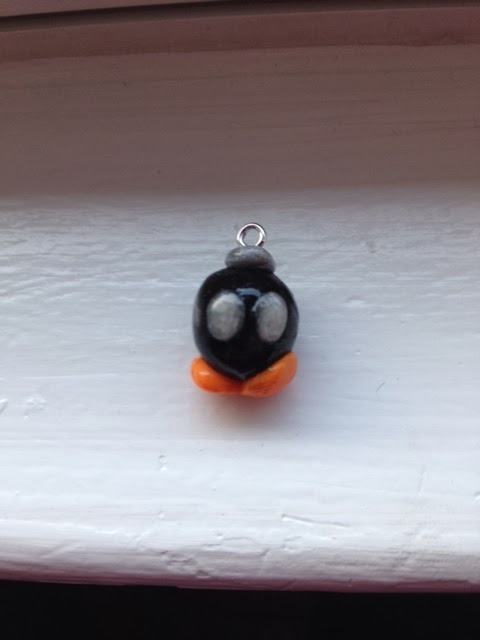
If you are familiar with the Mario Bros. video game, them you'll recognize this guy that my daughter made all by herself:


What was strange was how the white reacted in the different pieces.  The white in the Mickey came out so vibrant but in the cat, Bom Om, and Minion it seemed to take on a pearlized color.  Not sure if it was due to residue on our hands from the silver clay or from 2 different white packages...


It was fun creating these and it sure made up for being stuck inside on a beautiful day!


Saturday, 7 December 2013

Carolers

I happen upon these photos this past summer cleaning out a basement closet.  This is a craft I have repeated a number of times.  But this was my first attempt - my best guess is 2001!  In this photo the pine cone carollers are painted various colours.  But in other versions I chose to have the kids paint them white and add a bit of silver glitter.  They also used brown pipe cleaners for the arms to make them look like snowmen.  They always turned out great.


Caroler display outside the school office.

The heads are made from a Styrofoam balls with sequins (attached with pins) used to create the faces.  The scarves are strips of felt with a slit cut at one end to pull the other end through - no need for tying.  The hats are pipe cleaners twisted round and round and stuck into the back of the head.

Thursday, 31 October 2013

Saturday, 19 October 2013

Frankenstein Craft


Here is a cute little Halloween craft that we did with our Buddy class last week.  It is a simple craft using cardboard tubes from toilet rolls or paper towel rolls.

Materials:
- cardboard tube
- black, green and purple construction paper
- googly eyes
- silver pony beads
- craft glue

We made these by first flattening our tubes one way, openning them and flattening them again so that when they are openned again they are more of a square tube than a round one.

We use glue sticks to paste down a strip of black construction paper all the way around the tube on the bottom.  Then we did the same with a smaller green strip at the top.  Any excess paper hanging over the tube was either tucked in or timmed.

Next we used black markers to draw the face (not the eyes), ears and hair.

We used craft glue to glue on the eyes and beads.

A thin strip of purple construction paper was added to the front for his shirt and other pieces created the arms and hands.


Tuesday, 1 October 2013

Salt Dough Squirrels


If you liked my salt dough skunks then I hope you'll like these squirrels too!


My Grade 1s and 2s created these cuties with salt dough and following the same steps as the skunks.  Unfortunately I decided on trying a new recipe that did not work in our favor!  The dough was heavier on the flour - I thought that would make it smoother.  And as the squirrels baked the holes in the backs closed in more than I liked.  We also had a few that cracked!  I'll go back to my old recipe and turn down the oven for extra precaution.


We also only used half of the chenille stem as we did with the skunks.  I should have followed the same procedure as before as the tails could have used a bit more fluff.

This student forgot to make ears so we made some out of brown felt.  I think I like it the best!


For a step by step tutorial visit my Salt Dough Skunks

Saturday, 30 March 2013

Happy Easter!


I happen to come across this photo while scrolling through pictures on my phone.  I actually made this pine cone craft 2 years ago with my grade one class.  They were fairly easy.  We first painted the pine cones either white or yellow.  When dry they were stuffed with cotton.  Then using paper scraps the students made eyes, beaks and feet.

Wednesday, 23 January 2013

Clay Owl Ornaments

This clay activity is very popular on Pinterest and I couldn't wait to try it this year.  You can find the easy to follow instuctions on the crafty blog 4 Crazy Kings. 


We used air-dry clay to create these ornaments.  We also added a few extra details.  We used paperclips to make feather-like impressions on the wings and a wooded skewer to make the feet.  Then we added a paperclip to the top of the head so that we had something to tie our ribbon to.

When they were completely dry they were painted all over with white acrylic paint.  Then the kids had gold and silver paint to use as they wished.  We glued on dollar store gems to the eyes and added the ribbon.

My photos aren't the best as I was in a rush to get a couple of shots of them on my iPhone before they were sent home before the holidays...


LinkWithin

You May Also Like

Followers