Showing posts with label color. Show all posts

Wednesday, 1 April 2015

Mouse Paint Colour Wheels


I found this adorable colour wheel idea on Artsonia.com.  After reading the book Mouse Paint by Ellen Stoll Walsh we created our own versions.  We folded a sheet of paper into 6 squares - they do not have to be perfect squares!  We then painted each primary colour onto a square and then use our primary colours to mix our secondary colours and painted those on the remaining 3 squares.


The next day we used tracers on the back side of the painted papers to draw out our 6 mouse shapes.  We then glued them in a circle to replicate a colour wheel - all primary colours lie opposite their complimentary secondary colour.


We cut ears out of pink construction paper and used sharpies to add tails and eyes.


This student didn't follow the directions completely but I love how all the other mice look like they are fleeing the green one!  Pretty darn cute!


Tuesday, 5 February 2013

Primary Colours and Piet Mondrian


I have 2 Mondrain activities to share with you.  I love to use the works of Piet Mondrian to introduce primary colours to my students.

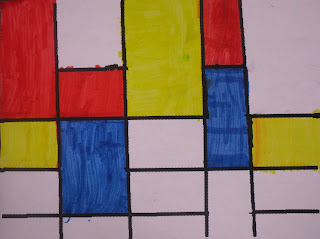
 I did the following Mondrian inspired art with my class last year.  Students used pencils and rulers to draw 5 vertical lines and 4 horizontal lines.  I then asked them to erase a few of the smaller lines created when lines crossed each other.  Using a black pastel the students traced over their lines.  We then used red, blue and yellow tempera block paints to colour in a few of the shapes... They probably coloured in too many but kids love colour and it was hard to keep them from painting in the whole page!


This second version I tried this year.  We integrated computers with art. 


Kids used the program KidPix to create their grid lines.  They had to use the pencil tool to draw straight vertical and horizontal lines from one edge to the other.  Then using the eraser they had to erase a few of the small lines.  Any erasing that took away too much black was later corrected with a black marker.
We then used broad tip markers to colour in the rectangular shapes.  It was a great opportunity to teach them proper colouring techniques using markers. 


I love how bold the lines turned out using the computer program.  Ideally we would have used the paint bucket feature to fill in the colour but our school's computer lab printer only prints in black and white.


LinkWithin

You May Also Like

Followers