Showing posts with label Halloween. Show all posts

Saturday, 22 October 2016

Haunted Houses


These amazing haunted houses were created by my Grade 1/2 class.  

I used this lesson idea by Art Teacher in LA.

First we used a directed drawing lesson for the house.  I used the steps found here for our houses, with a few modifications.  We discussed window shapes and students were free to include as many windows as they wanted.  I encouraged them to make big shapes. Students then drew a spooky tree and a moon.  I allowed them to also add tombstones or bats if they wished.

We then used our yellow oil pastels to colour in the moon and the windows and doors.  Black oil pastels were used everywhere else.

Students then painted blue and purple liquid watercolors for the backgrounds.  

Happy Hallowe'en!

Here are a few other Hallowe'en projects to try:


Tuesday, 4 November 2014

Halloween Arts and Crafts

Okay, I know I have not been very good about posting regularly lately.  My life seems to have been caught in a bit of a whirlwind the last couple of months and I feel like I have so much on my plate.  But I promise to be better!!!  It only took a fellow co-worker to post a Halloween activity I did on her blog before I put it on mine to get me in gear!  Thanks Sandra!  Go ahead and check out her Savvy Teaching Tips blog for some amazing teacher units.

Here are a few of the activities we have been working on:

Pumpkins:


I got this pumpkin art lesson from Barista Kids.  You can get a detailed lesson plan if you click on the link.  I substituted the oil pastels for chalk pastels.  I love using chalk pastels as they are so forgiving.  I can get the kids to start their first shape and tell them, "make it bigger" without negatively affecting their piece of work.  We did however use orange and green oil pastel to outline our drawings and add swirly vines.


Frankensteins:

Here is a really cute and easy craft I did on Halloween day.  Our primary wing usually does Halloween stations where classes will rotate through each of the four in our wing.  We only have about 20 minutes for each station so I can't plan anything too detailed.  This is what I came up with:

The colour is not the greatest in this iPhone photo

These Frankenstein faces were done on a 4 1/2 X 6 inch piece of green construction paper.  We did a directed draw in pencil, starting with the hair, straight line across for the eyebrows, nose, then eyes and mouth.  They used white chalk to colour in the eyes then used black oil pastel to trace over their drawing and colour in their hair.  The final step was gluing one inch squares of grey construction paper to the back of the head.  These were easily done in the 20 minute time slot and I think there was only one student who did not completely finish!  I wish I had more to show you as they turned out amazingly well, but the students got to take them once they left my classroom.


Mummies:


I got this adorable activity idea from Edventures With Kids, where you can get the full instructions.  The only things I changed was we used a gingerbread man template and didn't make it into a garland.  We also cut our paper eyes instead of googlies.

Tuesday, 22 October 2013

Frankstein Kids!


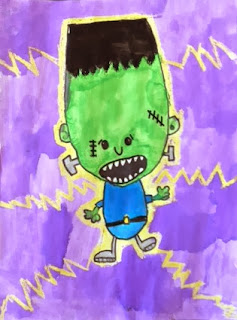
This past weekend I found this amazing site that has tonnes of cute and cool drawing tutorials.  As soon as I saw this Frankenstein drawing I knew I had to do it with my Grade 1/2 class.  Visit Rob's site at Art For Kids! for many many more great Halloween (and other) drawing ideas.  Thanks for the inspiration Rob!!!

I also modified the drawing slightly to create a female version.


Kids often have a tough time drawing large shapes and I really like to encourage "bigger is better" when I plan on painting.  We followed the same technique as used in my Reindeer Portrait tutorial.  Kids put down their non-drawing hand on the paper and have to create their head shape around their hand.  They do not trace their hand, but know that the pencil line has to go all the way around their hand. 


After their drawings are completed they take a yellow crayon to trace all the way around their kid, pressing firmly and creating a thick outline.  From there they draw and colour electricity or lightning strikes from their kid to the edge of the paper.  Besides adding some very cute detail to their drawings, the crayon also helped keep the paint inside the lines where it needed to be.  Students also used crayons to colour in their bolts, belts, socks and shoes.


Finally, we used watercolours to paint the larger portions of the Franken-kid and the background. 


I just love the way they all turned out!  I couldn't decide which one was cuter!

Happy Halloween!!!

Saturday, 19 October 2013

Frankenstein Craft


Here is a cute little Halloween craft that we did with our Buddy class last week.  It is a simple craft using cardboard tubes from toilet rolls or paper towel rolls.

Materials:
- cardboard tube
- black, green and purple construction paper
- googly eyes
- silver pony beads
- craft glue

We made these by first flattening our tubes one way, openning them and flattening them again so that when they are openned again they are more of a square tube than a round one.

We use glue sticks to paste down a strip of black construction paper all the way around the tube on the bottom.  Then we did the same with a smaller green strip at the top.  Any excess paper hanging over the tube was either tucked in or timmed.

Next we used black markers to draw the face (not the eyes), ears and hair.

We used craft glue to glue on the eyes and beads.

A thin strip of purple construction paper was added to the front for his shirt and other pieces created the arms and hands.


Saturday, 12 October 2013

Shake Dem Bones - Puffy Paint Skeletons

I LOVE October.  It is my favorite month of the school year.  We are just heading into Thanksgiving weekend here in Canada so any Halloween art projects are usually on hold until we get back next week. 

Here is one project I have done at home that would go great with the children's song "Dem Bones".


I followed Ed Emberley's step by step on how to draw a skeleton.  I lightly drew my skeleton with pencil on black craft paper.  Then I made some home made puffy paint using the recipe I found on http://getyourmesson.blogspot.ca   It is 1 part each of water, flour, salt and a squirt of white paint.  I then put the paint into inexpensive condiment bottles I bought at the dollar store (2 or $1.50). 


Gently squeezing the bottle I retraced my drawing with the puffy paint and left to dry over night.


When dry, carefully erase any pencil lines, if possible, and use a white crayon or pencil crayon to add lines around joints and bones to create a movement effect.

Tuesday, 30 October 2012

A Different Kind of Pumpkin Patch


I just had to add these decorated pumpkins to my blog.  Instead of going to the pumpkin patch each year, our Grade One and Grade Two students enjoy a mock pumpkin patch on our school playground.  One of our teachers goes to a local farm and is able to get 100 small pumpkins for about 50 cents each. The pumpkins are scattered around the playground and each class takes turns heading out for each child to pick out the perfect pumpkin.  It takes only a few minutes but the kids are overjoyed by the surprise. 

This year my class painted their pumpkin with either silver or "gold" acrylic paints using a foam brush.  These are actually bronze and not gold, as I was low on gold.  However, I prefer the bronze anyway...  The stems are painted with black acrylic paint.


When dry the students took turns painting white glue onto their stems and sprinkling black glitter on them.  I bought the glitter on sale at Michaels.  It comes in a test-tube looking container and actually looks more like little crystals than glitter flakes.


We then wrapped a black pipe cleaner around a pencil and glued these to the pumpkins.


I love the way these turned out and it was so funny how many adults came into the room to ask for instructions on how to make them for their home.

For more great pumpkin ideas, go here...The Great Classroom Pumpkin Project Linky

Have a happy and safe Halloween!!!

Monday, 29 October 2012

Going Batty!!!

Here is one more Halloween post for the year.  I saw this this adorable Halloween bat print on Pinterest and was instantly inspired to do it with my Grade One class.  It reminds me of a cartoon bat you would see in an old classic Bugs Bunny cartoon...

We were able to complete these in one art class.  Here are a few samples of our work:


First we created the background sky with chalk pastels.  Students were instructed to use 2 different colours from the set choices of different shades of blues and purples.   After using their fingers to blend all the chalk together we used black oil pastel to draw our bats.  They were encouraged to press hard enough to create thick solid lines and a round shape for the head.

Next they used their fingers to pull the pastel away from the shape to create a fuzzy effect.  Then they did the same to the lines in the wings.  Some were more successful at this than others but they all look adorable.


Finally they used the end of a pencil crayon dipped in white paint to print eyes.  A black sharpie was used to finish the eyes when the paint was dry.

Saturday, 20 October 2012

Going "Green" for Halloween!


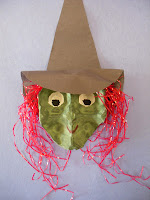
Last week we made these cute witches out of egg cartons.  This is very similar to an Halloween craft I did 2 years ago.  I found my crumpled up head sample in my Halloween box.  Here is the witch from the original lesson:


The finished witches had bodies as well but I only kept the sample of the head.  Although I recieved many compliments I thought I would never do them again because the hair and the hats were quite an ordeal to attach and I found I did too much of the craft for the kids. 

Then I saw this adorable scarecrow on Pinterest
and thought I could apply some of the same ideas to my witches.

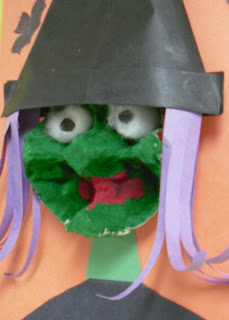
I precut all the egg cartons.  By cutting the bottom two egg cups at an angle it created
the perfect chin for our witches.

The hats were made by folding simple paper boats.  However, I found that they just were not pointy enough for my witches so I added an extra fold to sharpen up the hats a bit.  This was the hardest part as origami is not a developed skill in most grade ones.  But they managed with a little help.


The hair was made out of construction paper and glued to the inside of the hats before the heads were tucked in.  We glued in jumbo cotton balls and scrap pieces of black construction paper for eyes.  After all the pieces were glued to the construction paper background we stamped bats around the head for the final touch.


LinkWithin

You May Also Like

Followers