Showing posts with label holiday. Show all posts

Tuesday, 11 April 2017

Chalk Pastel Bunnies for Easter


How adorable are these little guys?!? 
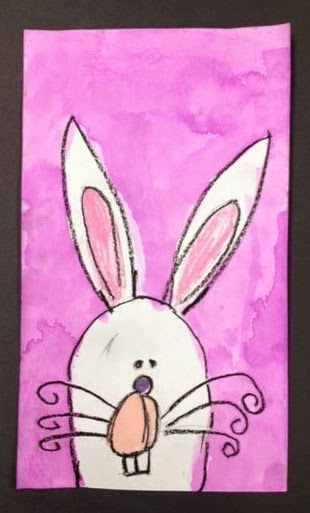
I experimented with a new bunny portrait lesson this year.  These bunnies were created by my little Grade 1 and 2 artists.

Created by 6 year old artist!
I love chalk pastels.  They are one of my favourite mediums to work with.  
But be forwarned as they are VERY messy.  


We did this lesson over 3 days as I spent the first day letting them explore the pastels on large sheets of newsprint and then practising how to make our bunny shapes.  We also practised not putting our free hand onto the markings we made on our papers...


The students started with a neck, then made 2 touching circles (like a sideways 8).  They traced over their circles repeatedly, trying to make them both the same size.  Its okay if they aren't right on the first go as you can always add to the shapes and rub away some of the mistakes.  Once the circles were pretty equal they continued tracing their circles a few more times.


Next they added a "hill" on the 8.  Again tracing until they were happy it was fairly centred on the sideways 8.


Next they added the ears.  I had said that they kind of make an M shape, and as you can see some of them took that very literally!! 


Once they were happy with their bunny form they were asked to use ONE finger to blend the chalk as if they were re-drawing the bunny - going in circle motions around the 8, back and forth on the hill, and the ears they were free to colour in the the chalk.  They were to try to drag the chalk into the shapes to fill them as they were tracing.


For the next part we switched to oil pastels.  They made a small upside down triangle in the 'dip' of the top of the sideways 8 and drew a line and upside down Y for the rest of the muzzle.  Eyes were added to the sides of the head and inner ears were coloured.


I got them to paint the backgrounds in liquid water colors to wash away any fingerprints around the bunny heads.


The final touch was to add whiskers with a black sharpie.


Monday, 2 January 2017

Stained "Glass" Trees


Here is an easy paper activity to do with your classes.  I got this idea from  HERE.  This activity could easily be done with the trees all in white and tissue in different cool colours for a fabulous winter window display - maybe next year for me! 


Students first cut out the tree template from 9 X 12 inch green card stock.  Then they glued pre-cut coloured strips of construction paper to one side of the tree.  They trimmed off any parts that showed past the tree on the outside.  They then added dots of white glue all around the template and strips and laid down a piece of green tissue paper.  When dry, they carefully trimmed off the excess tissue.


I did limit the kids to 6 or 7 strips though I don't think that's necessary: however, I do recommend that they use no less than 6.


Thursday, 8 January 2015

December Art

I know the holidays are over but I just wanted to share some of the wonderful art and crafts that my class did during the month of December.


 Love these salt dough ornaments!  So adorable and easy.  Find the original post here.  We added white iridescent sparkles to ours.  I will definitely do these again!


  Here is my version of the singing reindeer.  Think I would forgo the pipe cleaner antlers for a paper version next time - some of them have sort of an insects vibe :)


We made these paper strip Christmas trees.  Find the original post here.


And last but not least, we made these incredible elves with the help of Rob and his video at Art for Kids Hub.


I hope you all had a wonderful holiday!
Wishing you all the best for 2015!!!

Tuesday, 22 October 2013

Frankstein Kids!


This past weekend I found this amazing site that has tonnes of cute and cool drawing tutorials.  As soon as I saw this Frankenstein drawing I knew I had to do it with my Grade 1/2 class.  Visit Rob's site at Art For Kids! for many many more great Halloween (and other) drawing ideas.  Thanks for the inspiration Rob!!!

I also modified the drawing slightly to create a female version.


Kids often have a tough time drawing large shapes and I really like to encourage "bigger is better" when I plan on painting.  We followed the same technique as used in my Reindeer Portrait tutorial.  Kids put down their non-drawing hand on the paper and have to create their head shape around their hand.  They do not trace their hand, but know that the pencil line has to go all the way around their hand. 


After their drawings are completed they take a yellow crayon to trace all the way around their kid, pressing firmly and creating a thick outline.  From there they draw and colour electricity or lightning strikes from their kid to the edge of the paper.  Besides adding some very cute detail to their drawings, the crayon also helped keep the paint inside the lines where it needed to be.  Students also used crayons to colour in their bolts, belts, socks and shoes.


Finally, we used watercolours to paint the larger portions of the Franken-kid and the background. 


I just love the way they all turned out!  I couldn't decide which one was cuter!

Happy Halloween!!!

Thursday, 6 December 2012

Reindeer Portraits


Reindeer Portrait by Grade One student


My Grade One class painted these reindeer portraits this week!  I am so pleased with how they turned out!


Here is how we drew them:

Place a finger at the bottom of the paper and trace both sides to make the neck.
  
Using your opposite hand as a guide for size, draw a circle around your hand (not tracing) so that your oval is wider and taller than your hand.


Draw a line from the top of the head towards each of the top corners of your paper.


Draw ears at the top of the head pointing to the sides of the paper.

Draw a large horizontal oval at the bottom of the face for the nose.
Draw 2 vertical ovals at the top of the face for the eyes.


Add dots for the eyes and finish the antlers.
Draw a rounded square around the neck - there will need to be a bit of erasing here to hide the lines of the neck.

Finish the scarf.


We then used black oil pastels to outline our drawings and I had them paint the scarf, nose and the background.


Then next day we added a bit of peach pastel to the inside of our reindeers' ears, white to add details to the scarf, and went over our antlers and any other spots where we felt needed some more black outlining.  We used brown paint to finish the reindeer.


If you liked this post, check out some of my other directed drawing lessons:


LinkWithin

You May Also Like

Followers