Showing posts with label drawing. Show all posts

Saturday, 22 October 2016

Haunted Houses


These amazing haunted houses were created by my Grade 1/2 class.  

I used this lesson idea by Art Teacher in LA.

First we used a directed drawing lesson for the house.  I used the steps found here for our houses, with a few modifications.  We discussed window shapes and students were free to include as many windows as they wanted.  I encouraged them to make big shapes. Students then drew a spooky tree and a moon.  I allowed them to also add tombstones or bats if they wished.

We then used our yellow oil pastels to colour in the moon and the windows and doors.  Black oil pastels were used everywhere else.

Students then painted blue and purple liquid watercolors for the backgrounds.  

Happy Hallowe'en!

Here are a few other Hallowe'en projects to try:


Saturday, 15 November 2014

Don't let the Pigeon...


How much do little kids love the Pigeon?!  My grade one class cheers when I pull out one of Mo Willems' Pigeon books.  I was inspired by this Art Dish with MJ activity and used it during our safety unit.

We did a directed draw of the Pigeon.  Black oil pastel was used to trace over our pencil lines and yellow was used to colour in the beaks.  Then we painted our pigeons.  When dry we did a few touch ups where the paint may have blurred out some of our drawing.  Then students had to cut out their pigeon "in a bubble".  I do that occasionally due to the lack of cutting skills of many 5 and 6 year olds.  This way I can ensure that we won't lose half the pigeon in the process of cutting him out!


After brainstorming safety rules, each student chose one rule to print in a speech bubble.  Some examples were:
"Don't let the Pigeon talk to strangers."
"Don't let the Pigeon play with fire."
"Don't let the Pigeon stand on the chair"


Tuesday, 1 April 2014

Easter Bunny

Here is a cute and simple little art activity my Grade 1/2 class did for Easter.  

We did a directed drawing of these whimsical bunny rabbits on paper trimmed to 7 X 12.  Then we used oil pastels for colour and outlining.  The final step was to paint around the rabbits with water color paints.


Here is the step by step, similar to my Reindeer Portraits step by step:

 Students put their non-drawing hand at the bottom of the paper and draw around their hand (not tracing their hand) to make the head shape.  They put a dot in each of the top corners.  This will help them make their ears nice and long.


 Using the dots as guides, student connect the dot to the top of the head making the ears. Next they draw a dot in the center of the face.


From that dot they will make 2 circular shapes beneath it.  Encourage big shapes.  They do not need to be even or symmetrical.
The final step is to add a little bump for the nose, 2 teeth, whiskers that extend outside of the head and the inner ears.


Here are a few more examples from my students:


Saturday, 16 November 2013

Oil Pastel Owls

So I was at a loss of what to do with our Big Buddy class this week.  When I asked my buddy teacher if she had any ideas she said she had owls on the brain.  Owls?  I LOVE owls!

So here is what we came up with:


This piece was completed by a Grade 3 student

All of the pieces in this post were completed by students in grade 1, 2 and 3.

Taking turns we had students place both hands on their paper while their buddy, using the hands as a guide, made 2 large ovals around their hands.  As mentioned in previous lessons, I use this technique to help the kids draw BIG.  They have such a tendency to draw really small and bigger shapes help when filling in with colour.

Then we did a directed draw for the first owl.  Here are the steps:


 After drawing the details of both owls students outlined their drawings with black pastel.  Then they chose the colours for their owls.  They were directed to choose one colour for each owl and choose both a light and dark shade for contrast.


Then they added a branch, stars and a moon.  They then touched up their outlines, especially around the eyes where the original line may have smudged or faded during colouring.  Big Buddies helped with the touch ups for the younger students.


Tuesday, 22 October 2013

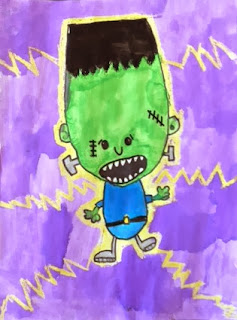
Frankstein Kids!


This past weekend I found this amazing site that has tonnes of cute and cool drawing tutorials.  As soon as I saw this Frankenstein drawing I knew I had to do it with my Grade 1/2 class.  Visit Rob's site at Art For Kids! for many many more great Halloween (and other) drawing ideas.  Thanks for the inspiration Rob!!!

I also modified the drawing slightly to create a female version.


Kids often have a tough time drawing large shapes and I really like to encourage "bigger is better" when I plan on painting.  We followed the same technique as used in my Reindeer Portrait tutorial.  Kids put down their non-drawing hand on the paper and have to create their head shape around their hand.  They do not trace their hand, but know that the pencil line has to go all the way around their hand. 


After their drawings are completed they take a yellow crayon to trace all the way around their kid, pressing firmly and creating a thick outline.  From there they draw and colour electricity or lightning strikes from their kid to the edge of the paper.  Besides adding some very cute detail to their drawings, the crayon also helped keep the paint inside the lines where it needed to be.  Students also used crayons to colour in their bolts, belts, socks and shoes.


Finally, we used watercolours to paint the larger portions of the Franken-kid and the background. 


I just love the way they all turned out!  I couldn't decide which one was cuter!

Happy Halloween!!!

LinkWithin

You May Also Like

Followers