Showing posts with label Fall. Show all posts

Monday, 28 September 2015

Coffee Filter Trees


I had to share these incredibly easy fall trees that my Grade One class made!

Students used eyedroppers to drip liquid water color paints onto coffee filters.  Don't be stingy with the paint as they will be brighter. You could also use washable markers to colour the filters and then spray with water.  But again, make sure they fill the filter with lots of colour!

 When dry, they cut out this fabulous tree template.  The template for the tree is from a book that does not allow me to share it here due to copyright limitations.  However, you could easily use something a lot less complicated as it was a challenge for a few of them.  However, you could hear a pin drop during cutting time due to the extreme need for concentration!!

Here is a free online template you could use for the tree.

These look so great in my window and it makes me smile every time I walk
 into my room and see them!

Tuesday, 23 September 2014

Leaf Magnification


Here is a very simple autumn art activity focusing on magnification and line.  After viewing a variety of leaves with magnifying glasses we created these close-up interpretations. 

Students drew a line down the middle of their page with an oil pastel.  They were then instructed to draw 3 or 4 more lines extending from the center line to the edges of their paper.  Then they coloured over their lines with their pastel to create a thick layer on their drawing.  They had the option to add other thinner lines/veins.  We finished by painting them with block tempera paints in fall leaf colours.

I LOVE the way they turned out!


Saturday, 16 November 2013

Oil Pastel Owls

So I was at a loss of what to do with our Big Buddy class this week.  When I asked my buddy teacher if she had any ideas she said she had owls on the brain.  Owls?  I LOVE owls!

So here is what we came up with:


This piece was completed by a Grade 3 student

All of the pieces in this post were completed by students in grade 1, 2 and 3.

Taking turns we had students place both hands on their paper while their buddy, using the hands as a guide, made 2 large ovals around their hands.  As mentioned in previous lessons, I use this technique to help the kids draw BIG.  They have such a tendency to draw really small and bigger shapes help when filling in with colour.

Then we did a directed draw for the first owl.  Here are the steps:


 After drawing the details of both owls students outlined their drawings with black pastel.  Then they chose the colours for their owls.  They were directed to choose one colour for each owl and choose both a light and dark shade for contrast.


Then they added a branch, stars and a moon.  They then touched up their outlines, especially around the eyes where the original line may have smudged or faded during colouring.  Big Buddies helped with the touch ups for the younger students.


Saturday, 12 October 2013

Shake Dem Bones - Puffy Paint Skeletons

I LOVE October.  It is my favorite month of the school year.  We are just heading into Thanksgiving weekend here in Canada so any Halloween art projects are usually on hold until we get back next week. 

Here is one project I have done at home that would go great with the children's song "Dem Bones".


I followed Ed Emberley's step by step on how to draw a skeleton.  I lightly drew my skeleton with pencil on black craft paper.  Then I made some home made puffy paint using the recipe I found on http://getyourmesson.blogspot.ca   It is 1 part each of water, flour, salt and a squirt of white paint.  I then put the paint into inexpensive condiment bottles I bought at the dollar store (2 or $1.50). 


Gently squeezing the bottle I retraced my drawing with the puffy paint and left to dry over night.


When dry, carefully erase any pencil lines, if possible, and use a white crayon or pencil crayon to add lines around joints and bones to create a movement effect.

Tuesday, 1 October 2013

Salt Dough Squirrels


If you liked my salt dough skunks then I hope you'll like these squirrels too!


My Grade 1s and 2s created these cuties with salt dough and following the same steps as the skunks.  Unfortunately I decided on trying a new recipe that did not work in our favor!  The dough was heavier on the flour - I thought that would make it smoother.  And as the squirrels baked the holes in the backs closed in more than I liked.  We also had a few that cracked!  I'll go back to my old recipe and turn down the oven for extra precaution.


We also only used half of the chenille stem as we did with the skunks.  I should have followed the same procedure as before as the tails could have used a bit more fluff.

This student forgot to make ears so we made some out of brown felt.  I think I like it the best!


For a step by step tutorial visit my Salt Dough Skunks

Monday, 29 October 2012

Going Batty!!!

Here is one more Halloween post for the year.  I saw this this adorable Halloween bat print on Pinterest and was instantly inspired to do it with my Grade One class.  It reminds me of a cartoon bat you would see in an old classic Bugs Bunny cartoon...

We were able to complete these in one art class.  Here are a few samples of our work:


First we created the background sky with chalk pastels.  Students were instructed to use 2 different colours from the set choices of different shades of blues and purples.   After using their fingers to blend all the chalk together we used black oil pastel to draw our bats.  They were encouraged to press hard enough to create thick solid lines and a round shape for the head.

Next they used their fingers to pull the pastel away from the shape to create a fuzzy effect.  Then they did the same to the lines in the wings.  Some were more successful at this than others but they all look adorable.


Finally they used the end of a pencil crayon dipped in white paint to print eyes.  A black sharpie was used to finish the eyes when the paint was dry.

Saturday, 20 October 2012

Going "Green" for Halloween!


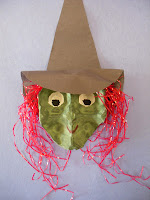
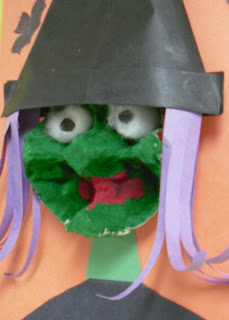
Last week we made these cute witches out of egg cartons.  This is very similar to an Halloween craft I did 2 years ago.  I found my crumpled up head sample in my Halloween box.  Here is the witch from the original lesson:


The finished witches had bodies as well but I only kept the sample of the head.  Although I recieved many compliments I thought I would never do them again because the hair and the hats were quite an ordeal to attach and I found I did too much of the craft for the kids. 

Then I saw this adorable scarecrow on Pinterest
and thought I could apply some of the same ideas to my witches.

I precut all the egg cartons.  By cutting the bottom two egg cups at an angle it created
the perfect chin for our witches.

The hats were made by folding simple paper boats.  However, I found that they just were not pointy enough for my witches so I added an extra fold to sharpen up the hats a bit.  This was the hardest part as origami is not a developed skill in most grade ones.  But they managed with a little help.


The hair was made out of construction paper and glued to the inside of the hats before the heads were tucked in.  We glued in jumbo cotton balls and scrap pieces of black construction paper for eyes.  After all the pieces were glued to the construction paper background we stamped bats around the head for the final touch.


LinkWithin

You May Also Like

Followers