Showing posts with label chalk pastel. Show all posts

Tuesday, 11 April 2017

Chalk Pastel Bunnies for Easter


How adorable are these little guys?!? 
I experimented with a new bunny portrait lesson this year.  These bunnies were created by my little Grade 1 and 2 artists.

Created by 6 year old artist!
I love chalk pastels.  They are one of my favourite mediums to work with.  
But be forwarned as they are VERY messy.  


We did this lesson over 3 days as I spent the first day letting them explore the pastels on large sheets of newsprint and then practising how to make our bunny shapes.  We also practised not putting our free hand onto the markings we made on our papers...


The students started with a neck, then made 2 touching circles (like a sideways 8).  They traced over their circles repeatedly, trying to make them both the same size.  Its okay if they aren't right on the first go as you can always add to the shapes and rub away some of the mistakes.  Once the circles were pretty equal they continued tracing their circles a few more times.


Next they added a "hill" on the 8.  Again tracing until they were happy it was fairly centred on the sideways 8.


Next they added the ears.  I had said that they kind of make an M shape, and as you can see some of them took that very literally!! 


Once they were happy with their bunny form they were asked to use ONE finger to blend the chalk as if they were re-drawing the bunny - going in circle motions around the 8, back and forth on the hill, and the ears they were free to colour in the the chalk.  They were to try to drag the chalk into the shapes to fill them as they were tracing.


For the next part we switched to oil pastels.  They made a small upside down triangle in the 'dip' of the top of the sideways 8 and drew a line and upside down Y for the rest of the muzzle.  Eyes were added to the sides of the head and inner ears were coloured.


I got them to paint the backgrounds in liquid water colors to wash away any fingerprints around the bunny heads.


The final touch was to add whiskers with a black sharpie.


Tuesday, 4 November 2014

Halloween Arts and Crafts

Okay, I know I have not been very good about posting regularly lately.  My life seems to have been caught in a bit of a whirlwind the last couple of months and I feel like I have so much on my plate.  But I promise to be better!!!  It only took a fellow co-worker to post a Halloween activity I did on her blog before I put it on mine to get me in gear!  Thanks Sandra!  Go ahead and check out her Savvy Teaching Tips blog for some amazing teacher units.

Here are a few of the activities we have been working on:

Pumpkins:


I got this pumpkin art lesson from Barista Kids.  You can get a detailed lesson plan if you click on the link.  I substituted the oil pastels for chalk pastels.  I love using chalk pastels as they are so forgiving.  I can get the kids to start their first shape and tell them, "make it bigger" without negatively affecting their piece of work.  We did however use orange and green oil pastel to outline our drawings and add swirly vines.


Frankensteins:

Here is a really cute and easy craft I did on Halloween day.  Our primary wing usually does Halloween stations where classes will rotate through each of the four in our wing.  We only have about 20 minutes for each station so I can't plan anything too detailed.  This is what I came up with:

The colour is not the greatest in this iPhone photo

These Frankenstein faces were done on a 4 1/2 X 6 inch piece of green construction paper.  We did a directed draw in pencil, starting with the hair, straight line across for the eyebrows, nose, then eyes and mouth.  They used white chalk to colour in the eyes then used black oil pastel to trace over their drawing and colour in their hair.  The final step was gluing one inch squares of grey construction paper to the back of the head.  These were easily done in the 20 minute time slot and I think there was only one student who did not completely finish!  I wish I had more to show you as they turned out amazingly well, but the students got to take them once they left my classroom.


Mummies:


I got this adorable activity idea from Edventures With Kids, where you can get the full instructions.  The only things I changed was we used a gingerbread man template and didn't make it into a garland.  We also cut our paper eyes instead of googlies.

Thursday, 24 April 2014

Mixed Media Flowers


Last week I was fortunate enough to be invited into my daughters Grade 4/5 class to do an art lesson.  I always look forward to the opportunity to work with intermediate students.  The toughest thing for me is deciding on a project that I can do in one hour or in one afternoon.  Here is what I came up with.


  In one afternoon we touched upon many concepts including colour choice, blending colours, proportion, overlapping and line.  The flowers were drawn and coloured with chalk pastel and outlined in oil pastel.  The backgrounds were painted with watercolor.

Monday, 29 October 2012

Going Batty!!!

Here is one more Halloween post for the year.  I saw this this adorable Halloween bat print on Pinterest and was instantly inspired to do it with my Grade One class.  It reminds me of a cartoon bat you would see in an old classic Bugs Bunny cartoon...

We were able to complete these in one art class.  Here are a few samples of our work:


First we created the background sky with chalk pastels.  Students were instructed to use 2 different colours from the set choices of different shades of blues and purples.   After using their fingers to blend all the chalk together we used black oil pastel to draw our bats.  They were encouraged to press hard enough to create thick solid lines and a round shape for the head.

Next they used their fingers to pull the pastel away from the shape to create a fuzzy effect.  Then they did the same to the lines in the wings.  Some were more successful at this than others but they all look adorable.


Finally they used the end of a pencil crayon dipped in white paint to print eyes.  A black sharpie was used to finish the eyes when the paint was dry.

Tuesday, 20 March 2012

Polar Bears


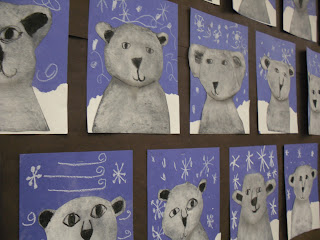
My Grade Ones made these cute polar bears back in February. 

Materials:
black construction paper
blue construction paper
white cartridge paper
white chalk
black and white oil pastel
black charcoal chalks (optional)

Using white chalk on black construction paper they used the sides of their chalk to rub a round shape for the head and a body.  Two smaller circles made the ears.  Students used their fingers to gently blend the chalk to remove any harsh lines that may have been created.  Black oil pastels were used to create the facial features and the inner ears.  We rubbed a little bit if charcoal under the head to create a bit of a shadow.  Then we cut our the whole polar bear shape.

 I gave each student a precut piece of white cartridge paper and showed them how to carefully tear along one of the longer ends to create our snow.  I would have used white construction paper but find the colour that the paper company calls 'white' to be extremely off-white and when placed beside the white chalk it looked more like dirty snow or slush!


We then glued our snow to the bottom of the blue construction paper.  This photo is a bit misleading as I actually got the students to glue the polar bear on first and then draw the snowflakes and wind.


The final display in the classroom was adorable!


LinkWithin

You May Also Like

Followers