Wishing everyone a safe and exciting Halloween!!!
Thursday 31 October 2013
Tuesday 22 October 2013
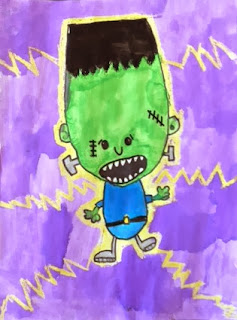
Frankstein Kids!
This past weekend I found this amazing site that has tonnes of cute and cool drawing tutorials. As soon as I saw this Frankenstein drawing I knew I had to do it with my Grade 1/2 class. Visit Rob's site at Art For Kids! for many many more great Halloween (and other) drawing ideas. Thanks for the inspiration Rob!!!
I also modified the drawing slightly to create a female version.
Kids often have a tough time drawing large shapes and I really like to encourage "bigger is better" when I plan on painting. We followed the same technique as used in my Reindeer Portrait tutorial. Kids put down their non-drawing hand on the paper and have to create their head shape around their hand. They do not trace their hand, but know that the pencil line has to go all the way around their hand.
After their drawings are completed they take a yellow crayon to trace all the way around their kid, pressing firmly and creating a thick outline. From there they draw and colour electricity or lightning strikes from their kid to the edge of the paper. Besides adding some very cute detail to their drawings, the crayon also helped keep the paint inside the lines where it needed to be. Students also used crayons to colour in their bolts, belts, socks and shoes.
Finally, we used watercolours to paint the larger portions of the Franken-kid and the background.
I just love the way they all turned out! I couldn't decide which one was cuter!
Happy Halloween!!!
Saturday 19 October 2013
Frankenstein Craft
Here is a cute little Halloween craft that we did with our Buddy class last week. It is a simple craft using cardboard tubes from toilet rolls or paper towel rolls.
Materials:
- cardboard tube
- black, green and purple construction paper
- googly eyes
- silver pony beads
- craft glue
We made these by first flattening our tubes one way, openning them and flattening them again so that when they are openned again they are more of a square tube than a round one.
We use glue sticks to paste down a strip of black construction paper all the way around the tube on the bottom. Then we did the same with a smaller green strip at the top. Any excess paper hanging over the tube was either tucked in or timmed.
Next we used black markers to draw the face (not the eyes), ears and hair.
We used craft glue to glue on the eyes and beads.
A thin strip of purple construction paper was added to the front for his shirt and other pieces created the arms and hands.
Saturday 12 October 2013
Shake Dem Bones - Puffy Paint Skeletons
I LOVE October. It is my favorite month of the school year. We are just heading into Thanksgiving weekend here in Canada so any Halloween art projects are usually on hold until we get back next week.
Here is one project I have done at home that would go great with the children's song "Dem Bones".
I followed Ed Emberley's step by step on how to draw a skeleton. I lightly drew my skeleton with pencil on black craft paper. Then I made some home made puffy paint using the recipe I found on http://getyourmesson.blogspot.ca It is 1 part each of water, flour, salt and a squirt of white paint. I then put the paint into inexpensive condiment bottles I bought at the dollar store (2 or $1.50).
Gently squeezing the bottle I retraced my drawing with the puffy paint and left to dry over night.
When dry, carefully erase any pencil lines, if possible, and use a white crayon or pencil crayon to add lines around joints and bones to create a movement effect.
Tuesday 1 October 2013
Salt Dough Squirrels

If you liked my salt dough skunks then I hope you'll like these squirrels too!
My Grade 1s and 2s created these cuties with salt dough and following the same steps as the skunks. Unfortunately I decided on trying a new recipe that did not work in our favor! The dough was heavier on the flour - I thought that would make it smoother. And as the squirrels baked the holes in the backs closed in more than I liked. We also had a few that cracked! I'll go back to my old recipe and turn down the oven for extra precaution.
We also only used half of the chenille stem as we did with the skunks. I should have followed the same procedure as before as the tails could have used a bit more fluff.
This student forgot to make ears so we made some out of brown felt. I think I like it the best!
For a step by step tutorial visit my Salt Dough Skunks
Subscribe to:
Posts (Atom)
LinkWithin
You May Also Like


