Saturday 29 December 2012

Snowflake Resists

Here is a winter art project I did with my grade one class last year before I started this blog.  I printed out large snowflake templates on my computer and allowed them to trace them by taping a blank paper to one of the templates.  Kids who had difficulty seeing the template through the paper were allowed to place their papers on the window.  The light passing through the window made the black lines show through more easily. Some children chose to remain at their desks and could see the outlines just fine. They used white oil pastel to try to replicate the snowflake onto their blank papers.  Encourage your students to press hard with the oil pastels.


When the large snowflake was complete they made other freehand drawings of smaller snowflakes around the large one.


Then the students used watercolors in cool colours to paint right over their oil pastel drawings and tracing. While the paint was still wet they sprinkled salt over the paint to create a frosty effect.


This creative student had the patience to outline the entire template instead of colouring it in!


Sunday 23 December 2012

Santa Gnomes

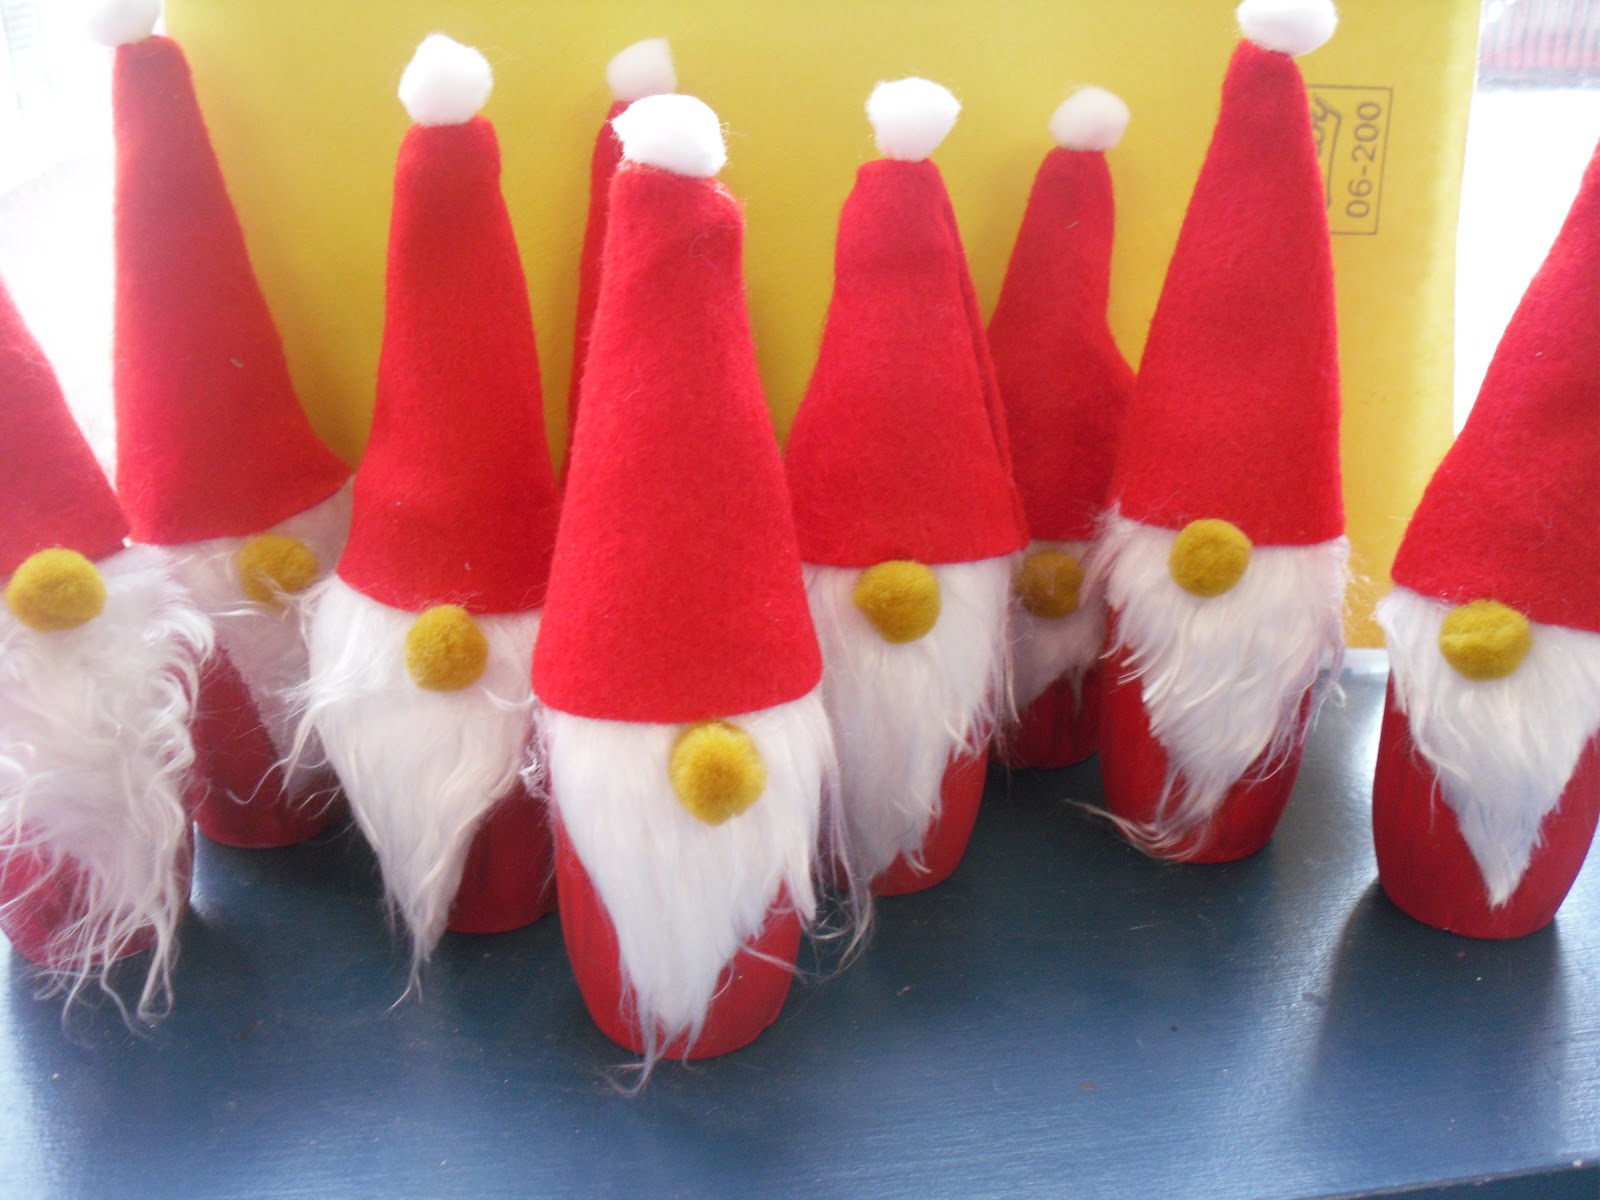
Digging through my big bin of craft supplies in the summer I found this bag of pom poms in this really unappealing colour that I had inherited somewhere in my teaching career.  I've had the bag for years as I really had no idea what to do with them, other than toss them into the arts and crafts center for the kids to use in their own projects.

Until I came across this little guy:


I found this winter gnome in Winners and was instantly inspired!  Old man winter turned into this Santa Gnome:


Supplies for this craft:

red felt
red acrylic paint
white and flesh coloured pom poms
small plastic bottles (I used DanActive)
White craft fur or cotton balls
glue gun (or red thread if you feel confident in getting your kids to sew)
craft glue

Directions:

1. Remove the labels from your plastic bottles.  I cut the plastic labels off all the DanActive bottles.  I happened to have tonnes that I had been saving to make penguins.

2. Paint the outside of the bottles with the acrylic paint and leave to dry.   I actually spray primed the bottles because I saw someone else do that when painting plastic bottles, but honestly I'm not sure it is necessary.  I did find that when the kids painted that the colour didn't go on evenly, even with a second coat.  If I did this project again (and I probably will since I still have so many pom poms left!)  I would probably try to replicate the original and paint the bottles with a coat of white and then sprinkle with white glitter!

I also taped the openings of the bottles when they were dry with packing tape.

3. Cut out shapes to make the cone hats from the felt - sorry I don't have a template.  Fold the felt and secure with a needle. 


Carefully open the felt - as if it was a card and draw a line of hot glue gun along the edge from top to bottom, and then close again.  Or, option 2 is to sew this edge with red thread.  Doesn't have to b really well done because it will be turned inside out.

4. I precut l the craft fur into triangles.  The kids used craft glue to glue the beards to the bottles.

5. When the hats were dry, we carefully turned them inside out and stuffed another cotton ball into them.

6. We then carefully put them over to the bottle and squeezed some glue underneath to secure them.


7. Use craft glue to add the white pompom to the hat and the beige one for the nose.


Thursday 6 December 2012

Reindeer Portraits


Reindeer Portrait by Grade One student


My Grade One class painted these reindeer portraits this week!  I am so pleased with how they turned out!


Here is how we drew them:

Place a finger at the bottom of the paper and trace both sides to make the neck.
  
Using your opposite hand as a guide for size, draw a circle around your hand (not tracing) so that your oval is wider and taller than your hand.


Draw a line from the top of the head towards each of the top corners of your paper.


Draw ears at the top of the head pointing to the sides of the paper.

Draw a large horizontal oval at the bottom of the face for the nose.
Draw 2 vertical ovals at the top of the face for the eyes.


Add dots for the eyes and finish the antlers.
Draw a rounded square around the neck - there will need to be a bit of erasing here to hide the lines of the neck.

Finish the scarf.


We then used black oil pastels to outline our drawings and I had them paint the scarf, nose and the background.


Then next day we added a bit of peach pastel to the inside of our reindeers' ears, white to add details to the scarf, and went over our antlers and any other spots where we felt needed some more black outlining.  We used brown paint to finish the reindeer.


If you liked this post, check out some of my other directed drawing lessons:


Saturday 1 December 2012

Sponge Print Poinsettias


Here is a great December art project to do with any primary class.  There are many versions of this project on Pinterest and art blogs.  Here are some of the final products done by my Grade One class.


This project does require a bit of prep work but it is absolutely worth it. 

Prep: You will need to buy a couple of packages of sponges and then cut them into petal shapes for the poinsettias (the sponges can be reused in the spring for other plant and flower art projects!).  I cut enough so that each child would have their own.  You do not have to worry about them looking 'perfect' as the kids will often use their entire hand to press the sponge to the paper and they create their own organic shape.

Directions:

1. Have the students draw 2 yellow dots on their paper.  I got them to put their left hand on the top left corner, point their thumb to the right, and draw the dot sitting on their thumb.  Then they put their right hand on the bottom right hand corner and drew the dot touching their thumb (not sticking out this time).  I did this to try to space the poinsettias far enough apart that they wouldn't overlap too much (a little is great) but not put them too far apart that too much of the flower is off the paper.

2. Students used a paintbrush to paint the red paint onto their sponge.  Using the yellow dots as a guide they pressed the sponge onto their papers so that each petal was radiating from the dot.  They continued all the way around the dot, and some were able to get 2 prints from one paint application. 

3. Then they did the same to the other dot.

4. When they were done they had to wash their own sponge and do their best squeeze as much water out as possible.  They then repeated the same printmaking process with dark green paint to add leaves around their poinsettias.  Then were then left to dry.

5. The next day we used a light green oil pastel to draw veins and texture onto the leaves and coloured around the poinsettia flowers.

6. The final touch was adding yellow or gold dots of glitter glue to the center of each flower. 


Wednesday 21 November 2012

Raccoons


My class has been learning about nocturnal animals and last week we focused on raccoons.  I actually lost sleep over this particular project!  I just couldn't decide what approach I was going to take!  I originally thought I would have the kids paint their drawings grey and then do the pastel details on top after the paint was dry.  Then I couldn't decide if I should do just a close-up of the face or a full body.  I had to include that tail though, so it couldn't just be the face.  After googling many different raccoon pictures for some inspiration I came across this idea from Apex Art.  I modified it a bit by doing our drawings right onto brown construction paper and had the kids colour in their details with oil pastels.


LinkWithin

You May Also Like

Followers