This clay activity is very popular on Pinterest and I couldn't wait to try it this year. You can find the easy to follow instuctions on the crafty blog 4 Crazy Kings.
We used air-dry clay to create these ornaments. We also added a few extra details. We used paperclips to make feather-like impressions on the wings and a wooded skewer to make the feet. Then we added a paperclip to the top of the head so that we had something to tie our ribbon to.
When they were completely dry they were painted all over with white acrylic paint. Then the kids had gold and silver paint to use as they wished. We glued on dollar store gems to the eyes and added the ribbon.
My photos aren't the best as I was in a rush to get a couple of shots of them on my iPhone before they were sent home before the holidays...
Wednesday 23 January 2013
Wednesday 16 January 2013
Snowflake Collage
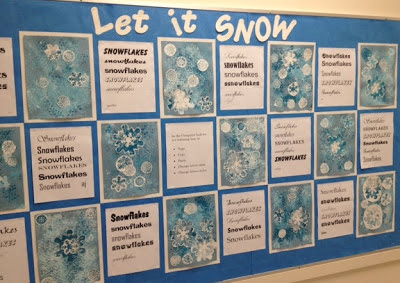
We have been experimenting with different printmaking activities to create these snowflake collages.
 |
| We added a computer activity to go along with our art display. |
To create these collages we first used bubble wrap to create the background "blizzard". Students painted blue paint onto their bubble wrap then flipped it over and made a few prints all over their paper. Then they painted white onto the bubble wrap which created a lighter tint of blue and printed that onto their papers. They continued with the white paint until they were actually seeing white prints on their papers.
At another station kids used brayers to roll paint onto snowflake stamps. Some of the stamps I easily made by glueing large foam stamps onto cardboard. The other smaller snowflakes were ones I bought on sale at Michael's for about 75 cents each.
When everything was dry the students had to carefully cut out their snowflakes. I asked them to leave a white boarder around each flake and not get the scizzors to cut the paint.
Here are some of their samples:
We also added a word processing component with our display. My kids worked on this during their computer block. Here is the sign I posted in the middle of the display:

Saturday 12 January 2013
Snowman Families
This was a last minute change of plans for my Friday Buddies activity. My Grade One class is learning about families this term, and this week I taught them the poem Snowman Family by Valerie Schiffer. And then Thursday evening I came across this project on Artsonia and knew I just had to do it. So when I came in Friday morning I quickly gathered supplies for this new lesson.
We had already discussed the difference between our immediate family and extended family. Students were asked to recreate their own immediate families out of snowmen and to consider the size of each family member when creating them.
To create a snowman the students used regular white chalk to draw the 3 circles of the snowperson and went over each circle 2 or 3 times. When each snowperson was done they used a finger to gently smudge the chalk (using a circular motion) into the inside of the circles.
Then they used oil pastels to create the noses and eyes - making sure to keep the noses within the shape of each head. Next they cut out each snowperson. They used templates to trace and cut out the circle and base of the snowglobe. Then they coloured in the bottom of the snowglobe and added snowflakes. In hindsight I should have either used white oil pastel or white crayon to colour in the snowglobe as you can see that the chalk left a lot of smudges.
Here are a few more samples:
Subscribe to:
Posts (Atom)
LinkWithin
You May Also Like


